D. Wireless Analog Controllers

An important thing to keep in mind is that to use a wireless analog controller in Omega the user MUST TURN IT ON AND HAVE IT SYNCED BEFORE THE GAME IS LOADED. If it is synced after the game is loaded it will not work.
You can map games to a wireless analog controller like an Xbox 1, Xbox 360 or similar controller. Some emulators like Nintendo 64, PlayStation 2, Play Station Portable (PSP), Nintendo GameCube, Dreamcast and many new PC games require an analog controller. That is, the controls on your arcade machine will not work on these emulators. You can also set up a wireless analog controller to work with MAME (Arcade Classic) games. Most wireless analog controllers are plug and play so all you have to do it turn them. If you have 2 of them, one will be player 1’s controller and one will be player 2’s controller.
Syncing/Pairing an Xbox Wireless Controller
Syncing an Xbox controller to your Extreme Home Arcades machine is straightforward.
- If you want to start completely from scratch, find where your Xbox dongle is plugged into the USB port in your arcade machine and then unplug it.
- Then, plug it back into the USB port.
- Push the button on the Xbox Dongle until a light on the dongle starts to blink and then let go.
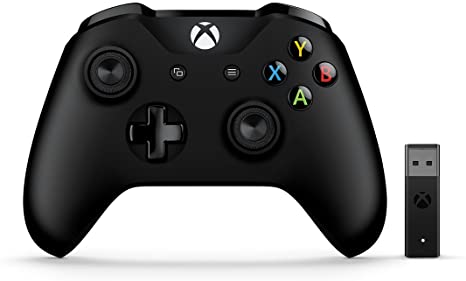
- Next, take an Xbox controller and push the “ON” button (which is the lighted X button in the center of the controller – see photo). The Xbox controller will automatically start trying to sync. When the “ON” button the Xbox controller stops blinking, the controller is synced.
- If you have multiple controllers, press the “ON” button for them as well to sync them. That’s it.
- If you controller does not sync, always check the batteries.
Mapping a Wireless Analog Controller to MAME (Arcade Classic) Games
Follow the instruction below to map a MAME (Arcade Classic) game to an Xbox controller.
- Turn on your wireless analog controller (Xbox controller).
- At the Big Box Main Wheel, navigate with P1’s Joystick to the ARCADE (Arcade Classics) wheel.
- Push P1’s START Button to enter the ARCADE Wheel.
- Navigate to “Green Beret - Rush'n Attack” and Push P1’s START Button. Green Beret will be loaded.
- Credit the game by Pushing the CREDIT Button.
- Push P1’s START Button to start the game.
- To pause the game HOLD P1’s START button and press P1’s Joystick DOWN. The game should now be paused. You can now access the Player Menu for Green Beret without the game playing.
- HOLD P1’s START Button and press P1’s Joystick RIGHT. This will bring up the Player Menu.
- Navigate with P1’s Joystick to “Input (this Machine)” and then Push P1’s START Button.
- This will bring up the mapping controls for the game.
- You will modify the game’s controls to use a wireless analog controller (Xbox). Before making any changes, take a photo of the controls as there before any modifications just in case something would go wrong – you will know where you started.
- Use P1’s Joystick to go to “P1 Up” and then press P1’s START Button to clear it.
- Next, press up on the DPAD on your wireless analog controller (this pad in the lower left of the controller). See photo.
- Do the same thing for “P1 Down,” “P1 Left” “P1 Right”
- Go to “P1 Button 1”, press P1’s START Button to clear it and then push a button on the wireless analog controller of your choosing. Do the same thing for “P1 Button 2,”.
- Go to “Return to Previous Menu” and press P1’s START Button.
- Go to “Return to Machine” and press P1’s START Button.
To unpause the game
HOLD P1’s START button and press P1’s Joystick DOWN
. The game should now be live. That’s it.
Mapping a Wireless Analog Controller in TeknoParrot
Turn on your analog controller (such as an Xbox controller). Sometimes it is helpful to play an analog controller game (like PlayStation 2 game first, before mapping a device to TeknoParrot – this allows your arcade machine to easily recognize the device).
- In this example we will map an Xbox controller to the TeknoParrot game, Raiden IV.
- Exit Big Box by HOLDING Player 1's START Button/[SHIFT] Button and simultaneously Press Player 2's START Button.
- Use the Track ball to point to the TeknoParrot icon on the Task Bar (at the very bottom of the screen). The TeknoParrot icon looks like a red parrot (if you hover over it – it says – TeknoParrotUI). Click on the TeknoParrot icon with the left AUX mouse button (with the AUX toggle switch being to the right) to open the TechnoParrot User Interface.
- Click on “Raiden IV.”
- Then, click on “GAME SETTINGS.” This will allow you to make some general changes to the game.
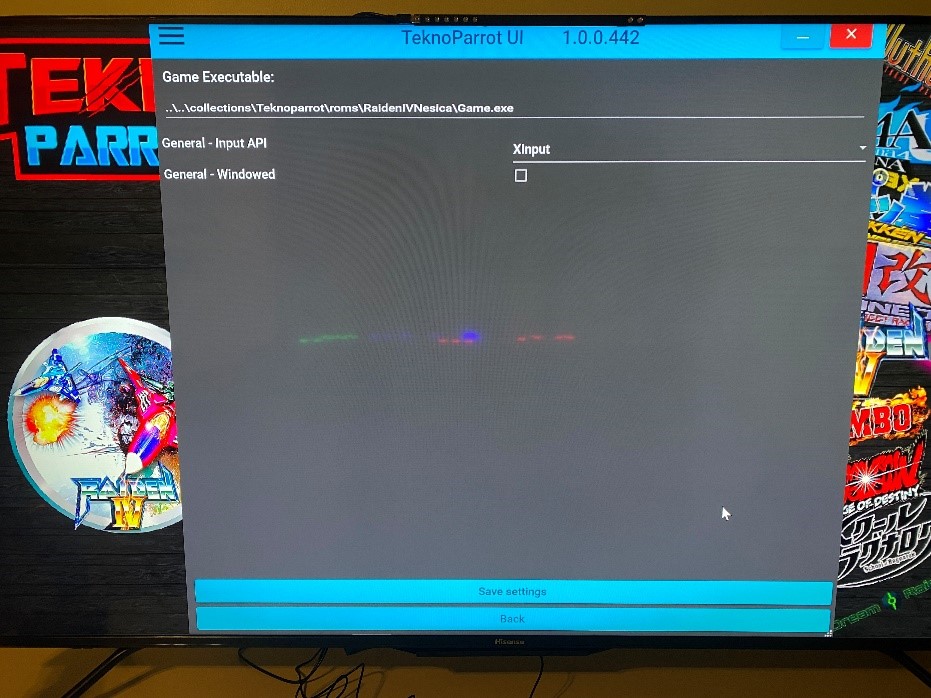
- For mapping an analog control, you want the input to be “Xinput.” If the “General -Input API” is not “Xinput,” then click on down arrow and change it to this. See photo.

7. If you made a change on the GAME SETTINGS screen, then click on “Save Settings.” If you did not make a change, click on “Back.”
8. Now, click on “CONTROLLER SETUP.” You will now setup the game for your analog controller.

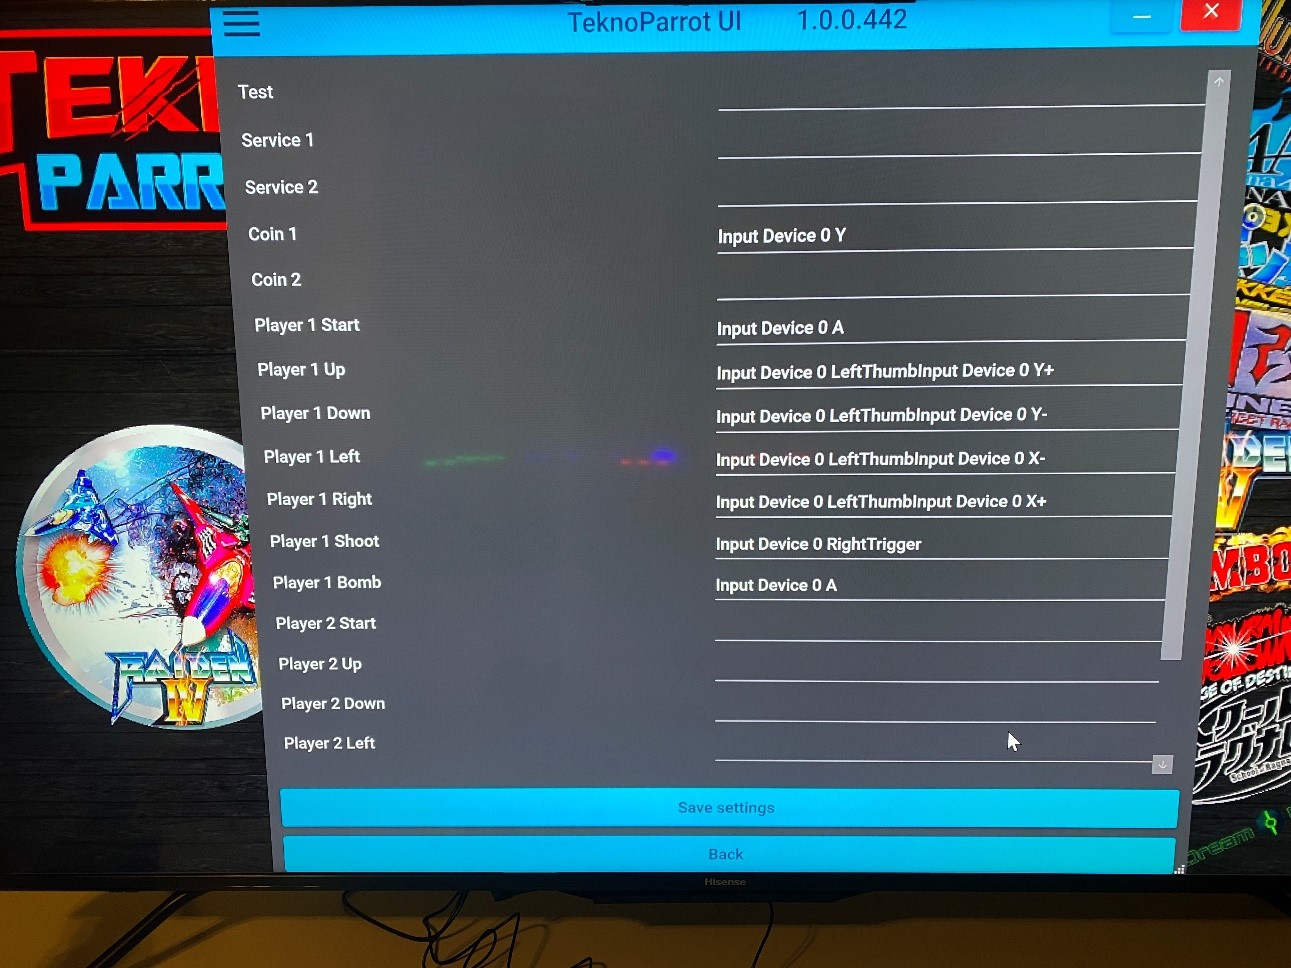
9. Use the trackball as a mouse (and the Aux buttons) to click on the line next to “Coin 1.” When you click on it - it will clear the current selection. Now, you can either click on Player 1’s Credit Button for example or you can select a button on your analog controller. it is completely up to you. The photo shows “Input Device 0 Y” which is a button on the user’s analog controller.
10. Click on the line next to “Start.” Again, this will clear the current selection. Now, you can either click on Player 1’s START Button for example or you can select a button on your analog controller.
11. Click on the line next to “Player 1 Up.” This will clear the current selection. Press your left stick on your analog controller UP. The screen should now say something like “Input Devie 0 LeftThumbInput Device 0 y+” (see photo).
12. Do the same thing (designate the corresponding left stick on your analog controller” for “Player 1 Down,” “Player 1 Left,” and “Player 1 Right.”
13. In like manner, designate a button on your analog controller for “Player 1 Shoot” (fire button) and “Player 1 Bomb.”
14. THEN, CLICK ON SAVE SETTINGS (don’t click on “back” or you will lose everything you just did).
15. Click on “LAUNCH GAME” to load Raiden IV and test out your controller setup. After you have tested your setup, exit Raiden IV by HOLDING Player 1's START Button/[SHIFT] Button and simultaneously Press Player 2's START Button.
16. Close the “TecknoParrot UI” Window (by clicking on the red X in the upper right corner of the window).
17. To go back to Big Box, click on the Big Box icon on the task bar or the Big Box Icon on the Windows Desktop (if you have a Marquee).