B. Mapping Overview (MAME)
A variety of peripherals (light gun, steering wheel/pedals, X-Box controller, flightstick, trackball, spinner, dance pad, etc.) are compatible with your machine. However, because there are so many available, often you must “map” or tell your machine what peripheral you are using and how you want it set up. This section will help you configure the games you play to the peripherals you want to use with them. This section is generally aimed at MAME (Multiple Arcade Machine Emulator) games but a few other emulators are covered as well. MAME games can generally be found in the ARCADE CLASSICS wheel in Big Box.
To access the Player Menu in MAME, load a MAME game (like Asteroids from ARCADE CLASSICS). When the game is loaded, PUSH AND HOLD P1’S START/[Shift] Button and then push RIGHT on P1’s Joystick. This will load the Player Menu (see screenshot). This was briefly discussed earlier in this manual in the “Big Box” section. It will be covered in more detail here and in future sections.
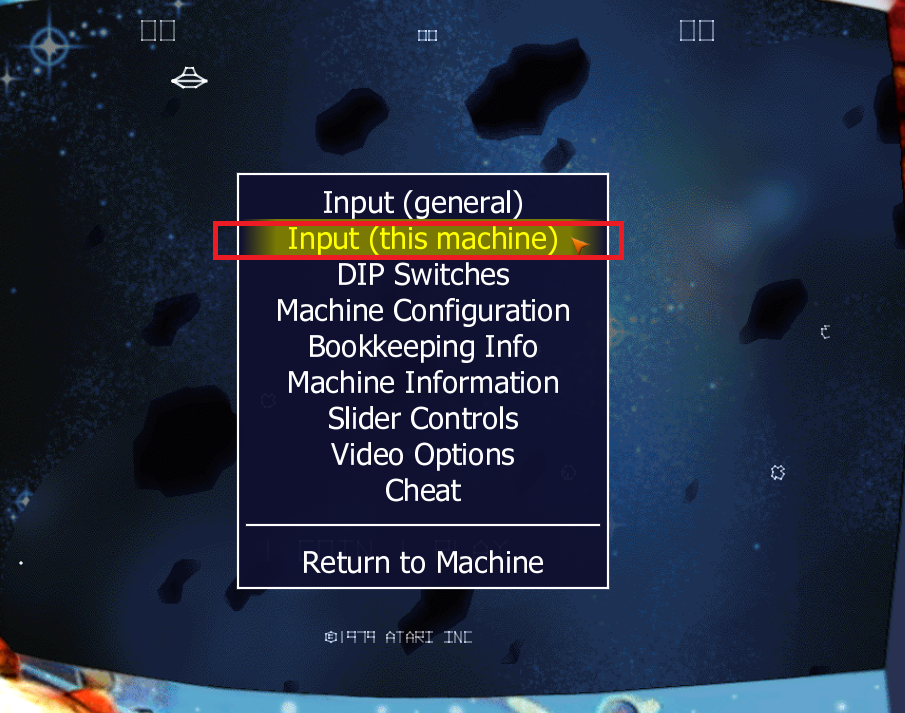
Typically, you never want to change to change “Input (general)” (see screenshot) since this will globally change all games in your system. With rare exceptions would you change something in “Input General.” Most of the time when you are mapping peripherals you will pull up the Player Menu and select “Input (this Machine).” This will make changes only to the game you have loaded, in this case Asteroids. To change the mapping for Asteroids, use P1’s Joystick to highlight “Input (this Machine)” (see screenshot) and Pressh P1’s START/[SHIFT] button. This will load the current configuration for Asteroids (see screenshot below). Note: before making any changes it is always advisable to always take a photo of the current settings. Note: do not make any changes at this time. To change the configuration the user would use the P1’s Joystick to select the item to change and then Press P1’s START/[SHIFT] Button. Then, press the device that you want to take its place – like a flight stick – and the new controller would be mapped. Specifics will be explained below. Use P1's Joystick to navigate to “Return to Previous Menu” and then press P1’s START/[SHIFT] Button. Use P1's Joystick to navigate to “Return to Machine” and then press P1’s START/[SHIFT] Button. You are now back at Asteroids.

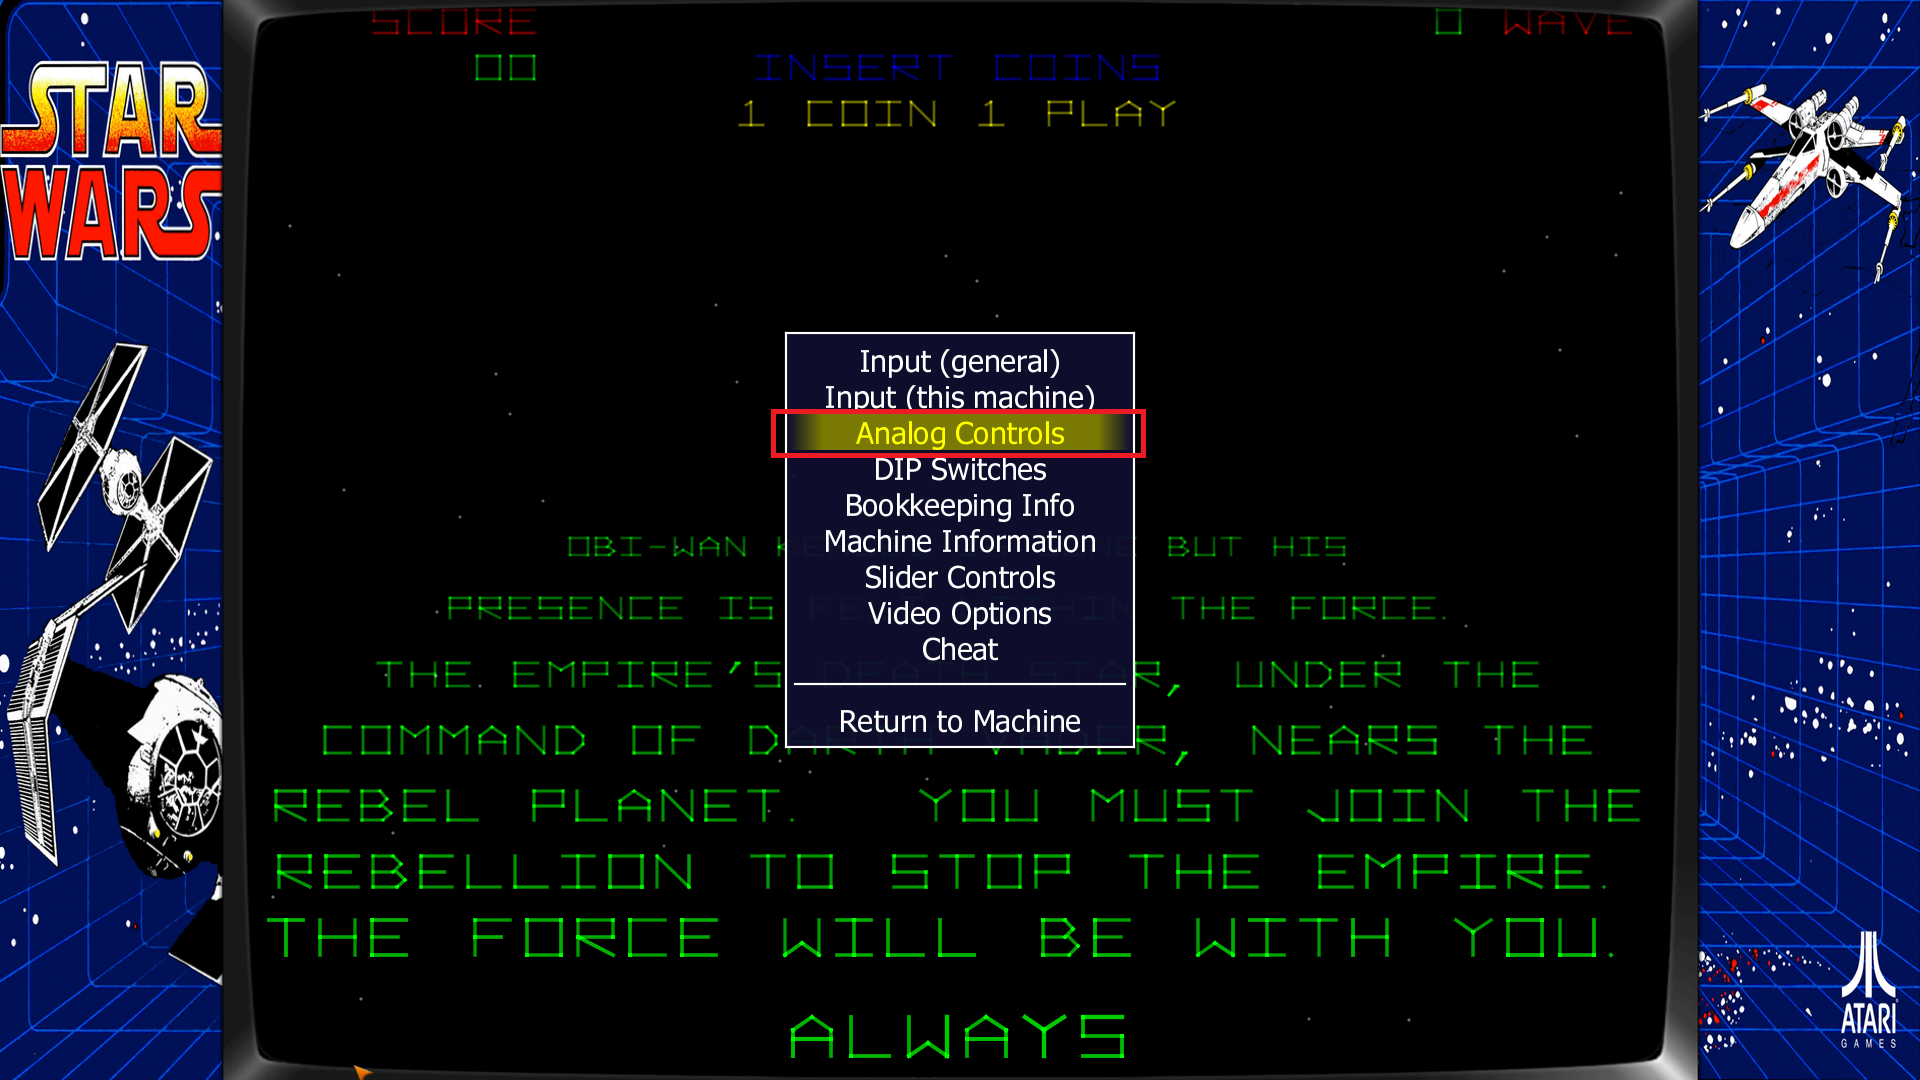
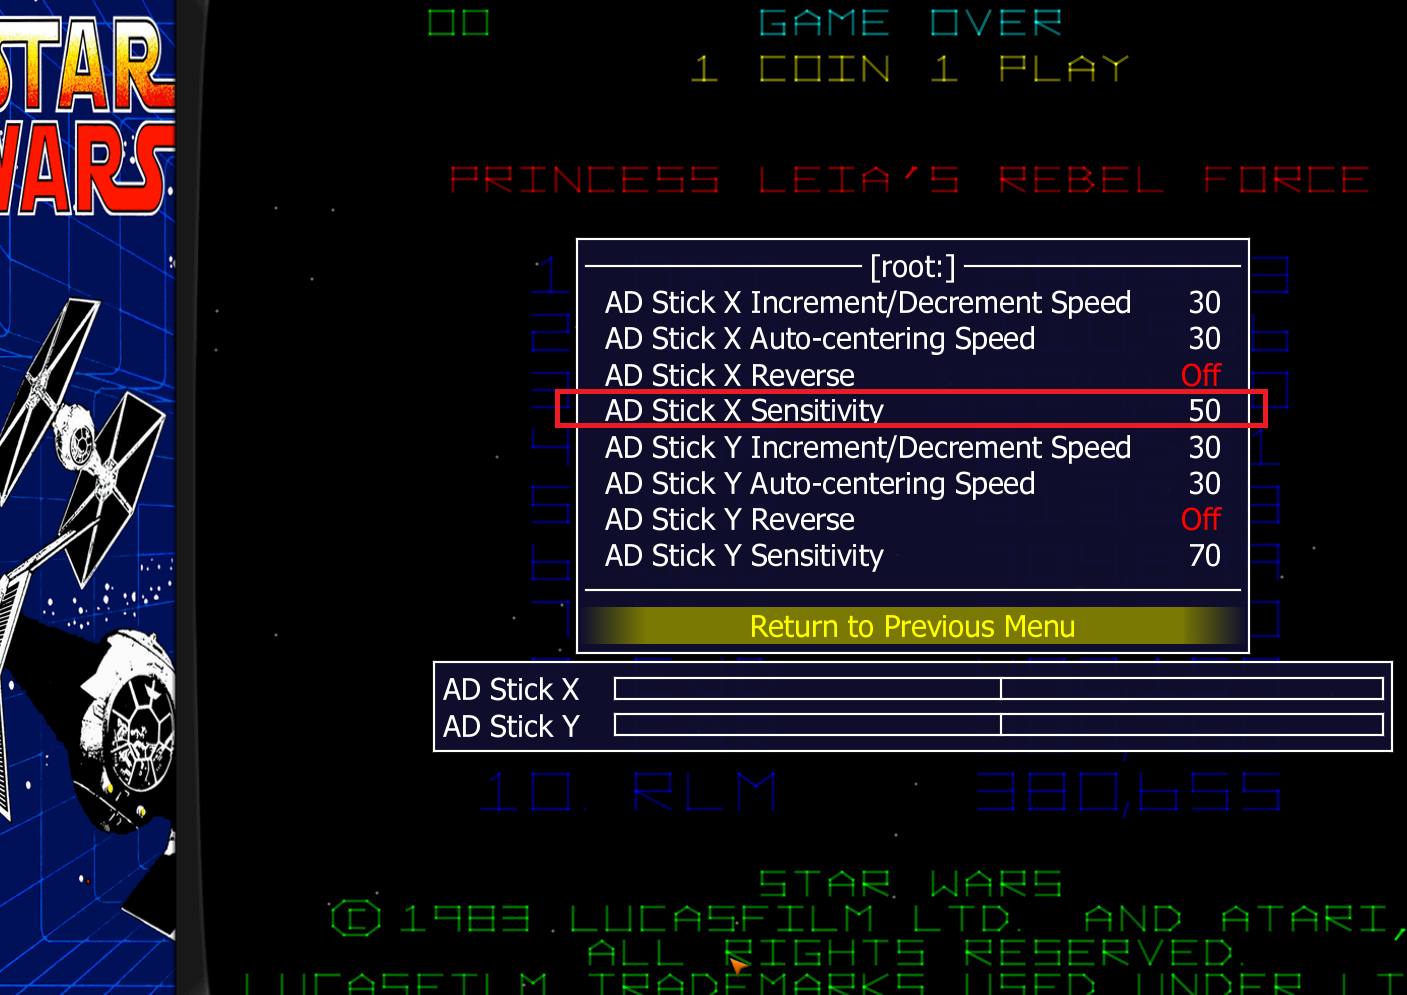
In the Player Menu, for some games and peripherals, like mapping a Flight Stick to the original Star Wars game (ARCADE CLASSICS) you can even adjust the sensitivity of the controls. This is done in the option “Analog Controls” (see screenshot below). For example, you can increase or decrease the sensitivity of the X (or Y) axis for the Flight Stick based on your needs (see second screenshot below). Different games and peripherals have different settings.
You will now practice what you have learned by mapping “Centipede” (a MAME game) to a trackball. Before proceeding make sure the AUX switch is in the right position. Use Player 1's Joystick to navigate to the ARCADE CLASSICS wheel and then navigate to Centipede and load it. Press the Coin button a few times so the game has money in it and then Press Player's 1's START/[SHIFT]button to start Centipede. Notice the game is mapped to Player 1's Joystick and Player 1's button 1 (fire button).
Mapping a Trackball in Arcade Classics (MAME)
1. HOLD Player 1’s START/[SHIFT] Button AND Press Right Player 1 Joystick (this will bring up the in-game menu). Note: It is always a good idea to take a photo of the original setup, just in case you want to go back to it.
2. Using P1’s joystick go to “Input (this Machine)” and Press Player 1’s START/[SHIFT] button to select it (NEVER ever select “Input (general)) – Input general make global changes to your arcade machine which you rarely, if ever, want to do).
3. Go to “Track X Analog” and Press Player 1’s START button to clear it.
4. Spin the track ball to the LEFT or RIGHT. You want it to say something like “Mouse 5 X” (see screenshot)- this may be different for your machine – but it should be something this (i.e., “Mouse 2X or some other of “Mouse #X” - see screenshot).
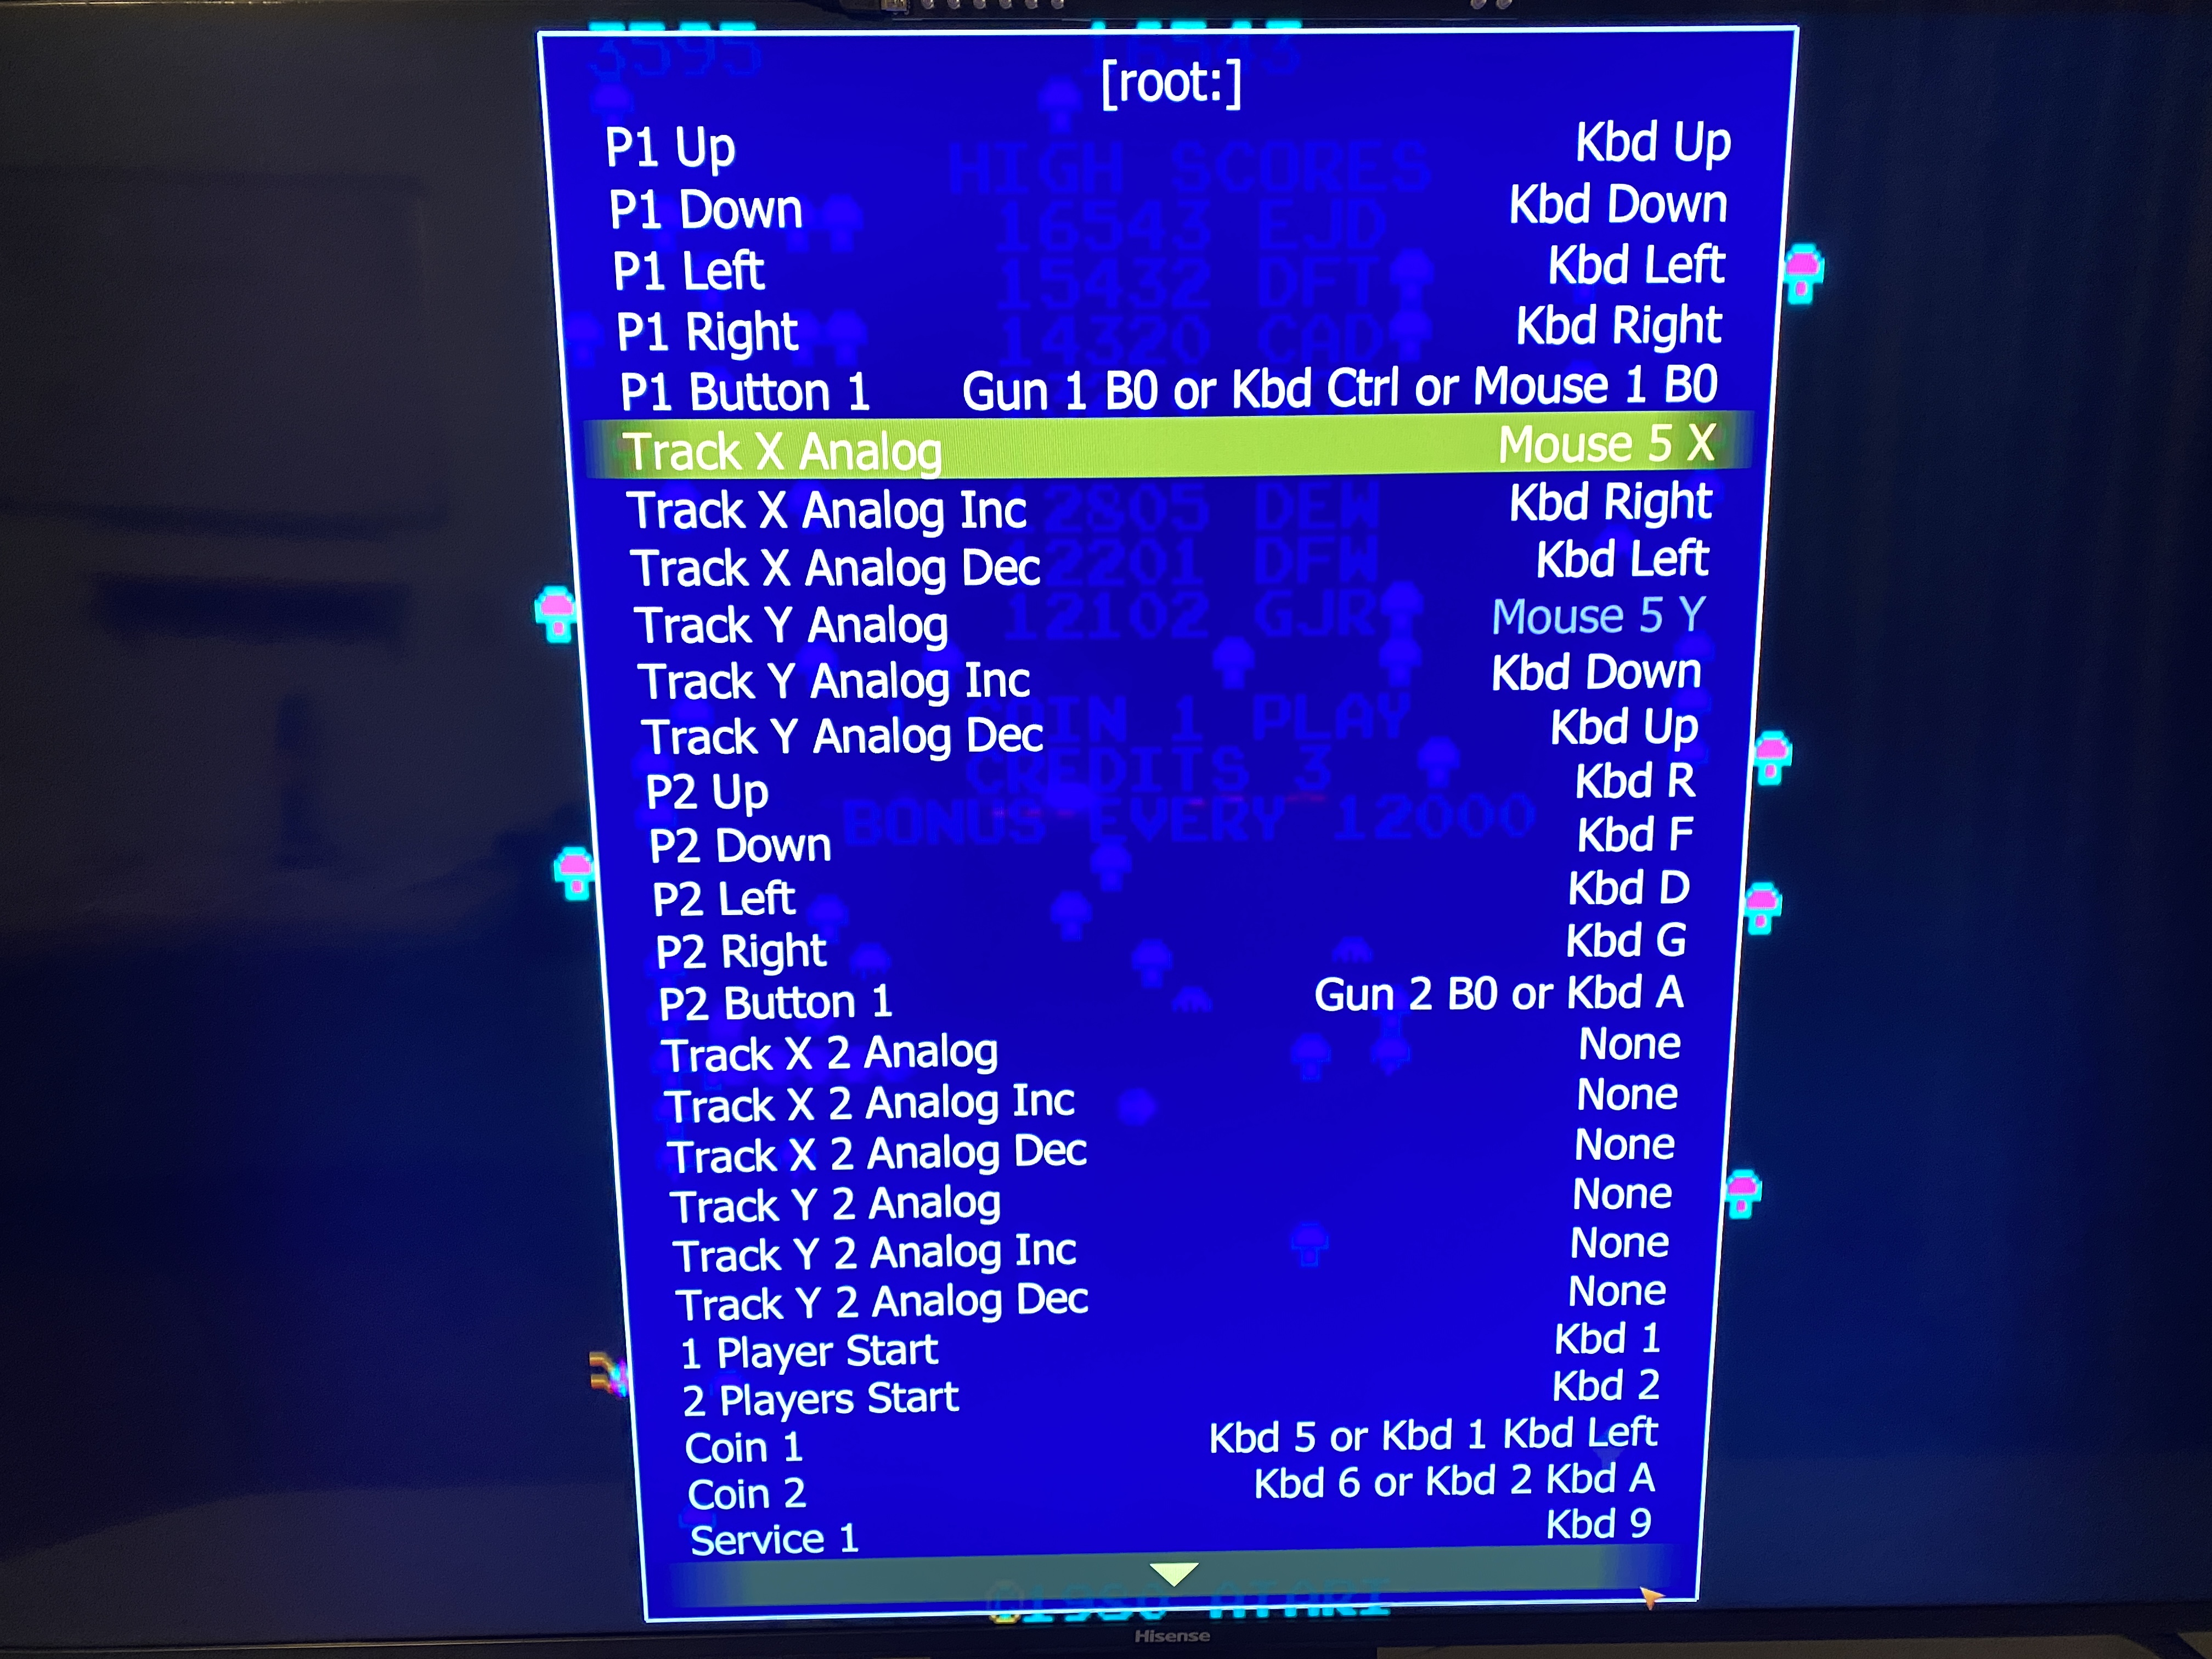
5. To go “Track Y Analog” and Press Player 1’s START button to clear it.
6. Spin the track ball UP or DOWN. You want it to say something like “Mouse 5 Y” (see photo- this may be different for your machine – but it should be something this (i.e., “Mouse 2Y or some other version of “Mouse #Y” - see screenshot).
7. You shouldn’t need to change anything else.
8. Use Player 1’s Joystick to go to “Return to Previous Menu” at the bottom of the screen (you may need to scroll down to see it) and Press Player 1’s START button.
9. Go to “Return to Machine” and Press Player 1’s START button.
10. Try out your trackball mapping setup.
11. If you would like to adjust the sensitivity (NOT “SPEED”) of your trackball do the following:
12. HOLD Player 1’s START/[SHIFT] Button AND Press Right Player 1 Joystick (this will bring up the in-game menu).
13. Using P1’s joy stick go to “Input (this Machine)” and Press Player 1’s START button to select it (NEVER ever select “Input (general)).
14. Using P1’s joystick go to “Analog Controls” and press Player 1’s START button.
15. Go to “Track X Sensitivity” and then press Player 1’s joystick and press left or right to adjust the sensitivity higher or lower.
16. Then exit out of the menu and go back to the game to test it out.
MAME (ARCADE CLASSICS) MAPPING Tips:
TIP 1 – Mapping with a Keyboard – Having a keyboard attached to your EHA machine when mapping peripherals is helpful. You can do this by plugging in a keyboard to an open USB port on your machine or your can setup a wireless keyboard on your machine (in a USB port). Here are some commands from the keyboard:
[TAB] Key – In a game the [TAB] Key opens and closes the Player Menu.
[CURSOR Key – Up, Down, Left, Right] – Allow you to move in the Player Menu
[ESC] Key – Takes you back a menu OR in a selection puts “None” in it (see below)
TIP 2 – (NONE – [ESC] Key: if you ever need to put “None” in a selection for mapping a peripheral you use a keyboard and hit the [ESC] key. If for example, you were mapping a game and for “Coin 2” (or any other selection) you needed to enter “NONE” you would press the [ESC] key on your keyboard.
TIP 3 – Multiple Commands in 1 Selection (Exception) - When you are mapping a game, sometimes you may want a selection to be mapped to multiple movements. For example, you may want to map the Pac-Man game to an eight-way joystick. Pac-Man originally had a 4-way joystick (up, down, left, right). The standard joysticks on your Extreme Home Arcade machines are 8-way joysticks. So, if you are playing Pac-Man with an 8-way joystick and you press left on the joystick to go left and you accidentally press up and left (diagonal) nothing happens and you may die. You can map your joystick to fix this! You would pull-up the Player Menu, go to “Input (this Machine)” go to “P1 Left” press Player 1’s START Button to the selection and then press LEFT on the Joystick. But you do not stop there. Now, press “Player 1’s START button and press Player 1’s Joystick UP and LEFT (diagonal), notice that instead of clearing it out, it added it to the section. Now, press “Player 1’s START button and press Player 1’s Joystick DOWN and LEFT (diagonal) and notice it added a third selection. It now reads something like “Kbd Left or Kbd Up Kbd Left or Kbd Left Kbd Down.” Any one selection will hold 7 or 8 movements but once you get to the maximum it will reset and put “None.” Have multiple commands in 1 selection is usually the exception and not the rule (see Tip 4).
Tip 4 - Only 1 Command in 1 Selection (Rule) - Typically, you only want 1 command in a selection. Say for example, you are mapping a steering wheel to a game and instead of one selection to turn left (X analog), you get 3 inputs. You wouldn't want 3 inputs for your steering wheel - just one. Use the [ESC] key to clear the inputs and start over so you only have 1 input. This will be covered later in this manual.